Tag Archives: Transitions

Tools For ProShow (Update)

This new update brings an additional 57 changes to the tools since the release of version 33a. A few of the changes were made to improve and ease the conversion of the worksheet to OpenOffice Format.

Layer Information was brought back from the change to Layer: Aspect/Dimensions so that it remains consistent with the Slide Information tool. That is, it provides aspect information. Additionally, the user can now provide their own list layers aspects they use regularly. This saves re-entering the information layer. So, the Layer Information section now has 4 separate Layer Settings to choose from. These settings are available for use by the following tools: Findings; Width & Height,Zoom; Text Box Aspect; Cropping Tool; and Layer: Outlines/Frames.

Those tools can quickly and easily switch between the various Layer aspects provided. It might not sound like much but, the increased flexibility makes it easier to make changes and perform the necessary analyses.

The release of ProShow Version 9 brought with it a change in how Zoom is handled. When Photodex implemented the FOLLOW FILTERS, it quickly discovered how broken the zoom function was within ProShow. This was very apparent when you tried to use zoom modifiers or for when you wanted to know exactly what a layer’s width and/or zoom was. Those considerations changed considerably when tilt was involved. So, Photodex made some significant changes to its handling of Zoom within ProShow.

A number of changes were made to the tools which deal with Zoom in some fashion so they are compatible with the changes in Release 9. The changes particularly affected Layer: Outlines/Frames and Modifier Zoom. These tools now provide backward compatibility to ProShow versions prior to 9, should you need that capability.

These changes are now available.

OpenOffice is a free Office suite that includes a worksheet with similar capabilities to those of Microsoft’s Excel. Both the EXCEL (XLSM) and OPENOFFICE (ODS) formats of the worksheets are made available.


170902-1140

Tools For ProShow

When I first released Tools For ProShow a couple of years ago, there were only 9 tools in it. Today, there are 25 (19 main tools and seven that are a part of the Findings tool). Tools For ProShow gives you access to ProShow capability that Photodex has not given you directly. The tools give you the capability to do things that are otherwise impossible, difficult to achieve, time consuming to do, or labor intensive. This is all to provide you as wide a variety of means to display your images as possible. All you need is the imagination, inventiveness, and drive to go beyond simply what Photodex has provided.

Over the time since the first release of these tools, I’ve learned quite a bit about ProShow too. I knew there had to be a way to do certain things and I found out how to do it. Some people work differently and try different things. . . so they engender ideas about how to present images. Sometimes it’s simply frustration that the program doesn’t provide what you want that leads to change. Well, to avoid reinventing the wheel, so-to-speak, I put those ideas into the Tools. Some get used frequently. Some rarely. It’s nice to have the tool available when you need it though.

As of this posting, version 10.17f1 is the most current release.

OVERVIEW
The tools in this section provide the information needed for use within ProShow. When the data or information is supplied, the results of calculations are provided. The following are included:

1.    Cropping Tool. Obtain cropping dimensions for a layer for a specific aspect. This is a significant enhancement over what ProShow provides. This tool is very flexible and very sophisticated to help you crop your layer to a specific aspect. PSG/PSP.
2.    Distances. Move a layer along the line of an angle of rotation for a specified distance or along a line perpendicular to that angle of rotation. PSG/PSP.
3.    Find Halfway Point. Find the slide location point located halfway between two layers given their Starting and Ending locations (X-Axis and Y-Axis). PSG/PSP.
4.    Findings. Exploits the relationships between pan, zoom, and rotate center, layer width and height. PSG/PSP. Note that PSG zoom values are always the same for each axis.
a.    Align Here. Position a layer’s side, corner, or center to a specific screen location.
b.    Calculated Settings. Pan, Zoom, and Rotate Center functions are interrelated. So, when two function values are known, deriving the missing function’s value is possible. This section calculates the value of the unknown function.
c.    Cover Layer During Rotation. Sometimes you will want to rotate a layer over the top of another, completely obscuring it from view. This tool provides information to do just that.
d.    Layer Width and Height. ProShow provides no layer width or height information. This section provides this information. If no values are provided in the ProShow Settings tool, layer width and height is provided for a layer at 100% zoom by default.
e.    Largest Width During Rotation. Sometimes you need to know what the largest width of a layer is for the given zoom setting during rotation. This tool provides that information.
f.    Locations. This gives the screen location of a layer, its side, or its corner. This information is provided for a given Rotation on some portion of the layer.
g.    ProShow Settings. Layer values from ProShow layer settings.
5.    Layer Information. This provides the slideshow’s layer information. There are three layers provided in this section. The section provides each of the three ProsShow Layers with dimensions (to identify the layer’s aspect) and associated scale. This tool’s information is also used by other tools: Findings, Cropping, Width & Height, Distances, Proportional Sizing and Placement: Layer 4, Layer: Outlines and Frames, Slide Information. PSG/PSP.
6.    Layer: Outlines/Frames. This tool gives settings required of a layer to give another layer the appearance of an outline. An outline typically has an equal size on each side of the layer. It also gives settings for an outline that creates the look of a Polaroid Photo (a larger outline section either at the layer top or bottom than on the other two sides). The tool provides zoom and modifier settings for creating a size change via the zoom feature versus changing the layer’s zoom directly. There is also a section that gives settings that allow a layer size change via cropping, a graphic editor, or the ProShow create Layer (Solid/Gradient) feature. This feature allows the creation of an outline in ProShow Gold. PSG/PSP. PSG compliant only for zoom settings that are the same for each axis. Cropping of an existing layer or creating a graphic of a specific aspect may be required to achieve results possible from within PSP.
7.    Modifier Rotation Calculation. Find the rotation value in terms of degrees, phase change, or modifier value. Modifiers make rotation changes in terms of a percent of a rotation. This tool makes choosing the appropriate rotation amount easy. PSP
8.    Modifier Zoom. This tool calculates the missing value when given two of three values: Starting Zoom, Ending Zoom, and Modifier. Zoom modifiers were found to be a bit more complex than once assumed. Ver 10.17 of these tools provided quick and easy access to accurate size changes to a layer via a modifier. It turned out that when zoom for each axis was different, the calculation of the modifier for the other axis changed from how it was calculated when both axes zoom was the same. When tilt was being used (horizontal or vertical), the zoom modifier calculation changed drastically.
9.    Position a Rotated Layer. Given a starting and final location, this tool gives the distance a layer has moved. When Desired Final Position is provided (for a layer that has been tilted — either vertical or horizontal) or rotated, the layer’s pan settings to position the layer at that desired location are provided. PSG/PSP.
10.    Proportional Sizing and Placement: Layer 4. This tool is useful for creating a layer that is proportional in size and location to another layer. PSG/PSP.
11.    Quadratic/Linear Function. This section provides answers for the ProShow modifier functions of Quadratic Curve and Linear Ramp. The quadratic curve uses an equation that defines a parabola. The ProShow factors define a region of that curve to position a layer. When the Quadratic Curve’s first factor (the quadratic factor) is set to zero, the effective equation defines the Linear Ramp. A linear equation defines a sloped line (which can also be defined as “ramp”). PSP.
12.    Slide Information. This provides the slideshow’s Frame Aspect and the Safe Zone size. This information is used by other Tools For ProShow tools: Layer Information, Findings, Width & Height, Distances, Proportional Sizing and Placement: Layer 4, Layer: Outlines and Frames. PSG/PSP.
13.    Time: Frequency. Determine the frequency for a given number of changes over a specific amount of time. Or find the number of changes that occur over a given amount of time and at a particular frequency. Then too, you could find the amount of time required for a specific number of changes at a given frequency. PSP
14.    Time: Show/Slide/Keyframe. Giving a Starting time (minutes and seconds) and a Final (or ending) time, a difference in time is calculated. Some modifier functions have the ability to start at the following three locations: Show, Slide, or Keyframe. As it can be important to know the actual start time at any given location because of the function used and it’s value at that time can be calculated. PSG/PSP. Usefulness within PSG is very limited.
15.    Text Box Aspect. Select a specific aspect for the Text Box. Sometimes you want to provide additional contrast between the background and the transparent background of the caption or text on a text layer. That graphic or ProShow layer may have a specific aspect you want to box to maintain. Sure, eyeballing it works too. However, sometimes you need specific information about the text box.
16.    Text Box Findings. The locations for each of the text box’s sides are provided. Since the text box changes physical location when the text alignment is changed, it also provides settings that can place the text box in its original location. Information from the Text Position tool (see below) is used as starting point information. Supplemental to that information, user provides the Text Box’s width and height.Note that the position information for this tool comes from the Text Position tool. If the position is such that the text box becomes clipped by the screen or layer edge, a warning is provided about the clipping and provides information as to what parts of the text box are clipped.
17.    Text Position. Captions use a different positioning system than Layers do. Text starts its zero point at the screen’s upper left corner. The lower right corner is the 100% of the screen location. Text layers are layers on which captions have been placed. As such, they have the benefits and characteristics of both Layers and Captions. A text layer’s text is positioned on the layer using caption positioning. The text layer is positioned as a normal layer. Therefore, the actual position of that text might need some calculation. This tool translates the positioning information between these two different measurement systems to provides TEXT POSITION (positioning of the caption or text layer text) or SCREEN POSITION (the apparent location of the text within the slide frame). To get text position, the Layer Pan value and the desired Screen location are needed. To get the screen position, the Layer Pan and the Text Position information is needed. PSP.
18.    USER Calculations. This section allows you to make calculations or use the contents of results found within the worksheet to create other calculations you can use for a variety of purposes. PSG/PSP.
19.    Width & Height.  This tool asks for the following information: frame aspect, layer aspect, and layer scale.  If the zoom is provided, the tool calculates the width and/or height. If the width and/or height is provided, the associated zoom value is provided. Width and Height of a layer can be important when you’re building an effect to present your image(s). ProShow provides none of this information. The Width and Height tool allows you to ask directly for a layer’s required zoom for a particular width or height for a given scale. Great time saver.PSG/PSP.

The calculations used to calculate relationships between pan, zoom, and rotate center were improved. They are now more concise and execute faster than previously. A few bug fixes were also included.

Here’s a link to the overview: Tools for ProShow Overview

Dale
161216-1507


Modifier Zoom

Modifiers were first introduced in ProShow Producer v4. Photodex has yet to improve them as of v8. It has been left up to the so-called “expert” ProShow user to figure out how to use them. One of the modifiers deals with a layer’s zoom setting. This modifier alters a layer’s zoom based on the layer’s existing zoom setting. It is entered as a constant value on the layer’s zoom setting.

A cursory review reveals that this constant value represents the percent of change of the layer’s existing zoom setting that is added to the layer’s zoom setting. So, if the layer has a zoom of 100 and a constant value modifier of 10 is assigned to the layer, when the layer is played, the layer will display as 110. If the modifier was -10, the layer would display as 90.

I’ve been using modifiers for years. I do not, however, use zoom modifiers all that often. But, too, I’ve only been making cursory changes using them. My main use has, in the past, been to periodically apply the modifiers to a layer to create appearance of an outline for another layer. These have been related to small changes in size.

I developed a tool in my TOOLS FOR PROSHOW that is used to define size changes to a layer to allow it to work as an outline or frame to another layer. It defines the size changes necessary in terms of zoom settings, zoom settings and modifier values, or a dimensioned layer of a specific and size. But, it was limited in utility to the specific task of frames or outlines. I wanted something that gave me more latitude. So, I created a tool, MODIFIER ZOOM that would help me create a modifier for zoom.

When creating a zoom modifier there are three attributes that are dealt with: a layer’s starting zoom, the final zoom value, and the modifier itself. But, knowing any two of these three values lets you calculate the missing value. Sometimes you want to know what value of modifier is required for a given setting of zoom that provides a desired zoom setting. But, likewise, you may know what the layer’s zoom setting and what its zoom modifier are. What you want to know then, is what the final zoom setting will result from that pair. Other times, you may want to know what the required starting value of zoom is for a given end zoom value and a specific modifier. So, that’s how I built the tool. Choose whether you want to know the start zoom, end zoom, or modifier … the tool will then ask for the values it needs to calculate the values being sought.

The tool was built on the idea that the modifier created a proportional change in the zoom of that layer. What I discovered, however, was that Photodex didn’t build the modifier zoom function that way. In the process of testing the tool, I discovered that the layer’s zoom settings were cross-related. The starting zoom value of one axis had an effect upon the modifier calculation of the other axis.

modifier-equation-x-axis

Equation 1. X-Axis Modifier

modifier-equation-y-axis

Equation 2. Y-Axis Modifier

Where Xe and Ye are the End value of Zoom for the X and Y axis respectively. Xs and Ys represents the initial (or Start) value of zoom for the X and Y axis respectively. Finally, Mx and My are the Modifier values for each axis (X and Y axis respectively). That’s all there is too it. However, note that while the percent change from the starting zoom has been understood for some time no, the idea that the other axis could affect the actual modifier value for current axis was unknown. Photodex has NOT documented any information about modifiers. This particular quirk of zoom modifiers was a big surprise.

Advanced Introduction to Modifier Zoom
Adding A Zoom Modifier to a ProShow Layer

© Copyright 2016, Dale L Fenimore, FPVP LLC, All Rights Reserved

161105-1845

PSP/PSG Layers as “Outline” Layers

Some years ago, I developed a tool in Excel to allow me to get around the limitations of the outline feature in ProShow. There is only one outline in Gold and it is narrow. However, it’s often either not narrow enough or not wide enough. Producer has five outline widths with 1 being the narrowest and 5 the widest. What I found was that the narrowest outline was often not narrow enough and the widest was not wide enough. ProShow outlines are centered on the layer’s outside edge. Changes to the outline’s width vary from that centerline. That means that half the outline is on top of the layer while the other half is on the layer’s outside edge. ProShow outline corners are also rounded. These outlines are not editable … and their appearance often leaves something to be desired. ProShow outlines remained unchanged since they were implemented.

If you want improved looking outlines you are on your own. What you must do is to create your own outlines. This is often done using another layer situated below the layer to which you want to give an outline. This other layer is then resized in some fashion to give the appearance of an outline or frame around the upper layer. What people quickly realize when they attempt this is that, unless the layer is square, a change in zoom results in a larger size increase in one axis versus the other. For instance, if your layer has an aspect of 1600:900, and you want to increase the size by 10%, you’ll find that 10% of 1600 is larger than 10% of 900. With locked axes, this results in a lopsided looking outline.

In Producer, you can unlock the X and Y axes and vary the zoom of each axis independently or use a modifier on each axis to effectively do the same thing. This option, however, is unavailable to Gold users since varying the zoom of each axis is unavailable. Further, Gold has no idea what a a modifier is. The only option left is one that requires adjusting the layer’s dimensions and applying an appropriate value of zoom. This approach, which works in both Gold and Producer, is not as easy as it sounds. As a valid option, it’s been prone to a labor and time intensive effort to get the dimensions and associated zoom correct. That is, until I completed some recent enhancements to my Equal Size Changes tool.

CREATE THE OUTLINE LAYER.

Define the Outline Layer. In the tool, you first identify the starting layer’s aspect (or dimensions), scale, and starting zoom.

Define the Amount of Size Change from the Reference Layer. Provide the desired amount of change to the layer’s size.

RESULTS. The tool then provides information that is useful in either ProShow Gold or Producer to create a layer you can use as an outline or frame for another layer. The result is either zoom values for each layer’s axes (or modifier values) or a layer’s dimension and associated zoom to be used when the graphic/solid color/gradient layer is imported into ProShow at the specified scale.

For Gold users, this provides an unprecedented capability for giving your image layer an outline or frame that looks like you want it to look. It is now possible to do things in Gold that are very similar to what Producer users are already capable of doing. While Gold users must use an appropriately created and sized graphic, Producer users (who can also use the graphic approach described) have the additional option to use either a solid color or gradient layer (when making simple outlines) when creating a layer being used for an outline.

The tool also provides information as to how much of the layer being created in a graphical editor would be seen as the “outline” around another layer. This means you can edit that region in any way you want and then delete everything else … actually creating a frame (a graphic with a transparent center).

This is a quick overview of the tool’s capabilities and how it can be used (in Gold and Producer):  FPVP TOOLS: Equal Size Changes Tool

Take a gander at the video overview … tell me what you think. Also, do not expect Photodex to provide this functionality to Producer or Gold any time soon.

160512-1855

FPVP Tools (Updated)

THEY’RE HERE! A few months back, I was asked if there was a way to reset the FPVP Layers values from the one’s entered. At the time, all settings changes depended on whatever values were entered. To set them all to a zero value was done manually. Also, a reset function would have required the use of a macro, a feature I hadn’t used for many years. But, I looked into it and one thing led to another. In the end, I made over 60 changes or tweaks to the existing program. I improved the functionality of the OpenOffice version which then were made compatible with LibreOffice (another freeware version of an alternative to Microsoft Excel). I enhanced the features of the Cropping Tool, Equal Size Changes, and Modifier Rotation Calculation.  I also added a tool that made it easier to figure out where a text layer’s text was on-screen. A text layer’s text is movable independent of the layer’s position. So, I created the tool to give me control I didn’t have previously. I let the tool tell me the screen pan values of the text given the text layer’s position and the position of the text on that layer. But it works both ways too. The position of the text on the text layer is given when you tell it where on the screen you want that text for a given position of the text layer.

This update (v10.11d) contains many changes and tweaks to the originally released version. Below are the main changes to FPVP Tools.

Cropping Tool. The aspect to which you want to crop a layer is now either manually entered or selected from a dropdown list of defined aspects. Also, a Zoom% feature was added. This is useful for cases where you are cropping a defined region of a layer within ProShow and you want to define it as a percent of the full sized image. Alternatively, if you create a crop region within ProShow, this zoom setting can be changed until one of the axis reports a size similar to what you have in ProShow. This will then give you the proper crop values for each axis that give the desired Aspect. Likewise you could keep the zoom at 1000% and enter the ProShow crop region’s values to obtain the crop values for the desired aspect. What is provided now are additional options that, hopefully, make the task of cropping your ProShow layer easier and more informative.

Equal Size Changes. Previously, the X and Y axes were required to have the same zoom setting. Now, they may have different values of zoom. You can now select the exact amount of change you want on all sides (scaled to the layer’s aspect). This change may be as small or as large as you want. Previously, the amount of change was made by entering a percent of change from the layer’s existing zoom value or as a specific value of zoom. These changes work for any size of zoom on any axis or scale of the layer.  The effective aspect of the layer before and after any changes is now displayed. This could be useful information for some situations. More useful information is the layer’s width and height before and after any changes. Further, the amount of change on each side (normalized to the frame aspect) is displayed.  This shows how large the change is on each side of the layer. The actual change on each side is also displayed for reference purposes as is the total change in width and height.

Note that this tool was specifically created to address the limitations in ProShow’s layer’s outlining and shadowing features. Add to that the fact that a 10% change in zoom size of a layer that is NOT square can result in a visual change that is larger in one axis than another. Visually, this is can result in some glaring disparities.

Modifier Rotation Calculation. This tool was modified to allow finding a layer’s amount of rotation, change of phase, and/or amount of rotation. An cell was added to provide the “Master” layer’s rotation amount. Also, a checkbox was added to have the tool calculate the amount of rotation required for a layer to obtain the desired rotation angle. There’s also an option now to have the tool calculate the difference in rotation.

For instance, if the existing rotation (Layer) is set to 120, Rotation (Additional) is -360. The tool reports that the Change of Phase is -1.00, Value of Modifier is -100.00, and a Rotation (Final) is -240.  If a “Master” Layer (a layer that another layer will “follow” the rotation of) has an existing rotation of 45, with the Layer’s values as given, the layer’s final rotation will be a rotation value of 525 degrees (when the modifier of 100 is added to the Layer AND the layer is also following the rotation of the “Master” layer).

At the very least, this approach can show you what the final rotation value is given the Master layer’s rotation and the follower layer’s rotation value for a given offset rotation amount. The basis for each result is given to the right of each of the three different lines the user can use as rotation input information (in degrees, change of phase amount, or a modifier value).

Text Layer Text Positioning. (NEW!) This new tool compensates for the fact that a text layer is a caption layer contained in a normal layer. The caption is positioned in a different positioning method than a layer’s position is. A caption is positioned where the 0,0 location is the upper left corner of the screen and 100,100 is the lower right corner of the screen. Further, the center point of a caption is located according to the alignment setting for that caption (left or right). The top to bottom center point is still roughly the halfway point from the top of the first line of caption to the bottom of the last line of caption, adjusted by the amount of leading associated with the typeface of the caption. So, the position of the text of a text layer is determined by the text’s selected alignment type (left, right, center) and the top-to-bottom center point of the caption. This tool helps to simplify figuring out exactly what the normal screen coordinates are for that text when the caption text is NOT the default 50,50 position. Likewise,  if you desire to know how to place of layer’s caption at a specific place on the screen for a specific layer positioning, this tool can calculate that for you too.

MACROS. Macros were also added to this new version of FPVP Tools. These macros allow you to reset the Layer Aspect in the Layer Information and within the FINDINGS section: reset the ProShow Settings, Highlights in the Calculated Settings section, and the dropdown list selections in Locations and Align Here. Specific graphics provide the ability to reset all of them at once (The graphic associated with each layer under the Layer Information section) or separately (in the Findings section). Previously, when the language was changed, the dropdown list selection displayed remained displayed in the original language. You had to manually change each dropdown list selection. That no longer is the case. Select a different language and the dropdown list is refreshed to display the the default selection in the language selected.

OPEN OFFICE 4.1.1 and LIBRE OFFICE 5.3. The ODS worksheet works substantially the same as the EXCEL Version. The previous OpenOffice release version had some problems which have all been addressed. Libre Office did not properly import the ODS worksheet previously released and this has been fixed as well. OpenOffice and Libre Office are free spreadsheet programs that provide substantially the same capabilities as Microsoft Excel. If you don’t have Excel and don’t have the money to spring for it, OO and LO provide excellent alternatives that do NOT break the pocketbook.

SUMMARY. FPVP Tools provides the ProShow user a means to access ProShow’s power without becoming an expert on how ProShow performs its magic. It provides a means to do things that are otherwise impossible, extremely difficult, or very time consuming to do. If you have an inquiring and open mind as to ProShow’s capabilities, FPVP Tools is a way to save you time and effort to effectively display your images.

If you want to make effective use of ProShow’s rotate center feature, for instance, FPVP Tools is the only way to do it. FPVP Tools allows you to define a specific point around which to rotate or tilt a layer. Many layers may then use the same rotation point. At this time, ProShow does not provide the means to effectively use the Rotate Center function.

Effective placement of a layer, when precision is necessary is significantly enhanced using FPVP Tools. This is far superior to eyeballing placement of a layer and its support components, whether you use some form of “motion” or a static presentation (that is, when using the features of pan, rotation, zoom, or tilt).

FPVP TOOLS Update Coming

A revised release of the full version of FPVP Tools is coming in the near future. Time permitting, I hope to released in the next week or so. Those who’ve already purchased a copy of the FPVP Tools will receive the update automatically. I’ve had very little time

FPVP TOOLS OVERVIEW
For those of you unfamiliar with FPVP tools, it’s a set of tools I started developing right after I discovered how to effectively use the Rotate Center function back in 2010. Discovering how to use actually use the rotate center function for something other than rotating a layer on its side or corner opened up lots of possibilities. So, I kept notes. The tools I developed kept me from re-inventing things and helped reduce some calculations when creating effects within ProShow.

ProShow provides absolutely no way to effectively use the Rotate Center function for other than rotating a layer on its side, corner, or center. Beyond those limitations, you are on your own. With FPVP Tools, you can select the exact screen position around with to rotate or tilt a layer. Also, any layer can rotate on that same location. It doesn’t matter that the layers can all have different sizes, scales, aspects, or locations themselves. FPVP Tools tells you the appropriate rotate center value.

I now knew exactly what a layer’s height and width was no matter what scale or zoom setting. That helped with layer placement. Not all images I use have the same aspect. Sometimes I used those images together in the same slide. So, I created a copping tool to let me crop images to a specific aspect. That improved the look and feel of the images on the slide. While Proshow allows you to crop (and move that crop region around) a layer, it provides no feedback to let you know what aspect the layer is cropped to. It means you must perform the math to figure out the proper cropping amounts.

The rotation and tilt entry values are in degrees. But, when it comes to creating a rotation/tilt using a macro, you are entering a rotation amount in terms of a percent of a 360-deg rotation. So FPVP Tools has a tool to do the conversion calculation for you.

A new tool helps you determine the screen location of text on a text layer. The text on a text layer is simply a caption encapsulated on a normal layer. The text on that layer is positioned like any caption is: 0 to 100 from left to right and 0 to 100 from top to bottom. Then, the layer itself is positioned according to 50% of the layer being on each side of layer center. Sometimes you need to know specific information. For those times, I’ve created a tool that helps determine the actual location on the screen of that text. It can saves you time and effort.

Want to rotate a layer and then move a specific distance along the angle of rotation or along a line perpendicular to that rotation value? There’s a tool for that too. To do that manually in ProShow is a kind of hunt and peck method. When you need precision, the tool in FPVP Tools is the only way to go. It saves time, effort, and frustration.

And there’s more …

FPVP TOOLS REVISIONS OVERVIEW
A while back, I received a request for reseting layer settings. So, I took a look. This capability required macros, a feature I’ve had little use for over the years. After looking into it a bit, I included a variety of macros that achieve the desired effect. I also looked into other areas in which improvements could be made to the FPVP tools. I subsequently made 52 tweaks, fixes, and changes to the them since the last release. Some of the more visible changes:

The Cropping Tool was expanded to include a set of defined target cropping aspects. Instead of manually entering the aspect to which you wanted a layer cropped, you could simply select the desired aspect from a drop down list.

The Modifier Rotation Calculation was expanded to include the calculation of a difference between layer’s rotation values. It includes a Master layer entry to make it easier to calculate a modifier to follow the rotation of another layer by a specific amount. This might be easy to calculate manually, but this takes some of the guesswork, time, and effort out of it.

Resets. There are now 4 different resets provided. One resets a layer’s aspect, all of its settings, and the highlighters. Another resets only the layer’s settings. Another resets only the layer’s highlighters. The final one resets the dropdown box selections when the worksheet’s language was changed. Previously, a change in language required manually changing each dropdown choice to get the correctly displayed language.

Equal Size Changes.
1) Layer Zoom. Earlier versions did not correctly calculate the layer size change for each axis when the layer’s initial zoom settings were not the same. The previous release locked the Y-Axis to the X-Axis value, keeping the initial layer aspect unchanged. The upcoming release now allows different values of zoom for the X and Y axes. When the desired change in size is selected, the tool now correctly calculates both axes settings (zoom and modifiers), for any scale selected.

2) Exact Size Change. It is now possible to select the exact amount of change to each side of the layer’s center. Select a size of 0.01 or 5 or 20 … and the tool will correctly calculate the necessary values for the new X and Y axis zoom settings. When using a layer to create an outline for another layer, it is now much easier to select the exact width of that outline.

3) Width, Height, Aspect. This tool now displays the layer’s width, height and effective aspect both before and after the selected amount of change is displayed. This is important for those wanting more precise control over how their layers appear in ProShow. Controlling a layer’s width and height can be very important to the look and feel of a slide’s content from one slide to another.

Text Layer Text Position. As discussed earlier, this new tool allows you to determine where the text of a text layer is in the layer coordinate system. Or, it will tell you the text layer position for display at a specific screen location. Of course, this tool only works with a layer that has no applied tilt or rotation.

A number of changes were also on some look and feel, bug fixes, or minor corrective actions. This is particularly true of the OpenOffice version of the worksheet. That worksheet now also works within LibreOffice. Both of which are freeware alternatives to Excel. The look and feel or the OpenOffice version has been made to be as close to the Excel version as possible.

FPVP Tools for ProShow – UPDATE

FULL VERSION, Freebie Version

Ok, as promised, the latest version of the FPVP Tools has been released v10.9f. It is provided in XLS (Excel 97-2003), XLSX (Excel 2007 through 2013), and ODS (OpenOffice Calc 4.1.1). The addition of the OpenOffice format is new. OpenOffice is an Office Suite that offers an alternative to Microsoft Office but is somewhat compatible with it. It’s also FREE.

As stated in the previous post, Microsoft doesn’t support a number of key features I was using in my Worksheet. OpenOffice did a decent job of importing the Excel 2013 worksheet but, it did not translate everything perfectly … and a number of tweaks were required. I believe I got most of them.

With this release of the tools, I made quite a few changes. Each tool can help in creating effects in ProShow. They can minimize the amount of and intensity of planning that would normally be required. I also found a way to determine exactly where a rotated layer (rotated using the rotate function) was located on the screen. Rotate the layer on a rotate center and its actual screen location is determinable. This is useful for when you want to stop at a specific rotation value, then move the layer along the rotated angle or perpendicular to it without having to rely on a modifier. This is also important from the perspective that if you change the rotate center of a layer that is rotated on a rotate center tends to “move” or adjust its position if you change its rotate center. Knowing exactly where the layer is lets you swap out the current layer for a repositioned layer … and then do things that would be otherwise impossible to do. The effect would be extremely difficult to achieve in any other fashion … and not intuitively obvious as to how you actually achieved that effect (for those trying to duplicate what you did).

Another tool lets you find the physical location of a layer that’s been rotated/tilted (in increments of 90 degrees). ProShow includes the modifier functions of Linear Ramp and Quadratic Curve. This release includes tools to take advantage of those features. The Linear Ramp is actually a sub-function of the Quadratic Curve. The Quadratic curve feature is actually quite a bit more complicated than it looks. It defines a parabola … but the tools that ProShow provides gives you no insight into where on that curve you are for the values you use. The FPVP Tools of Quadratic / Linear Function graphs the values you provide and lets you actually see where you are on the curve or what the linear ramp looks like for the given values. It helps to design from a knowledge of exactly what is happening in ProShow.

These are the biggest changes but, a number of usability changes were made too. If you like to tinker with things, this is a tool that can help you ferret out the features of ProShow … features that ProShow has but which it doesn’t provide direct access to.

FULL VERSION, Freebie Version

FPVP TOOLS – Info Update

I know it’s been quite awhile since anyone’s heard a peep from me but, I have been busy. The “day” job has been pretty good at taking up most of my free time. However, in my free time I have worked on some effects that I created while working on demonstrations to support how to use my FPVP Tools. The development of those new effects are now mostly done complete. However, I’m in the testing and demo developing phase and that can take some time (due to the limited free time, doggone it). At present there are 4 basic effects that are comprised of some 44 styles. So, hopefully I’ll finish the fine tuning and tweaks soon. Then, i can start releasing them. I think you’ll like what you see when you finally see them.

I’ve also been hard at work improving and tweaking the Full version of my FPVP Tools. A substantial number of changes were made to the tool set last released. Importantly too, switching languages does not impact column widths as much as what occurred previously. As of now though, I believe that testing is mostly complete. I hope to have and an update in the near future.

Recently, someone asked me whether my Excel worksheet (in which the FPVP Tools were developed) would work in OpenOffice. I’d forgotten completely about that choice. A quick check revealed that every time I imported the Excel worksheet into OpenOffice, it acted a little differently. Seems the translation is not perfect. Further, Microsoft does not support a number of features that I used in the worksheet … effectively crippling the utility of any export to an OpenOffice format from within Excel (at least, for now).

All is not lost however. OpenOffice 4.1.1 imported most of the worksheet intact. I just had to figure out what it was not translating or was not translating correctly. Once I figured that out, it turned out the fix wasn’t anywhere nearly as bad as it initially appeared to be.

The FREEBIE version of FPVP TOOLS – Basic now includes an OpenOffice compatible worksheet.

The full version of the FPVP Tools still requires some tweaking to deal with some formatting issues and such. But, the main issues appear to have been resolved. I hope to have an OpenOffice compatible version of the FPVP Tools – Full available with next release. Hopefully I can do that in the not too distant future.

Keep tuned!

ProShow Unleashed: Beyond the Manual

The FPVP book is now available:

http://fenimorephotovideos.com/BeyondTheManual.html

The book has gone through a slight name change from when I first announced it and there’s even more content too. The 97 page book is in PDF format.

Useful for both Novice and Expert users, there is something in this book for everyone. I hope you find it useful. The link above takes you to the webpage with the updated table of contents (no page numbers though). This is the first book of its kind for ProShow users.

Dale


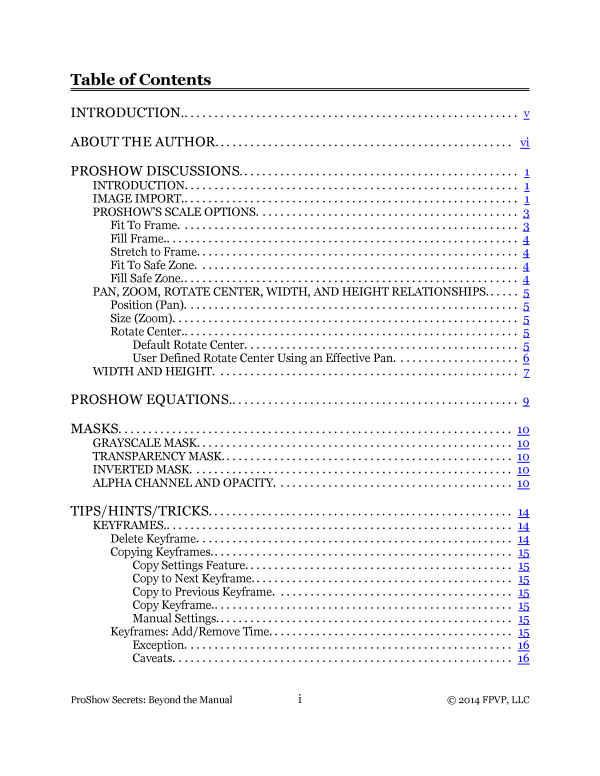
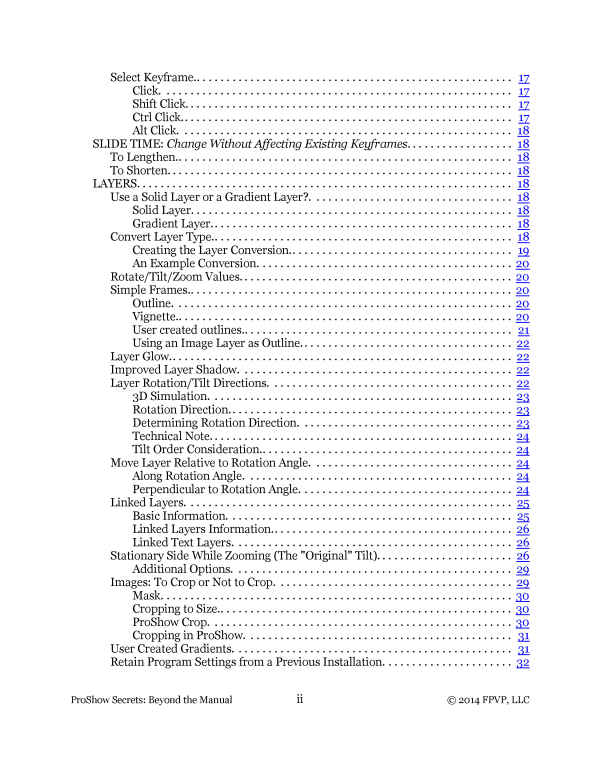
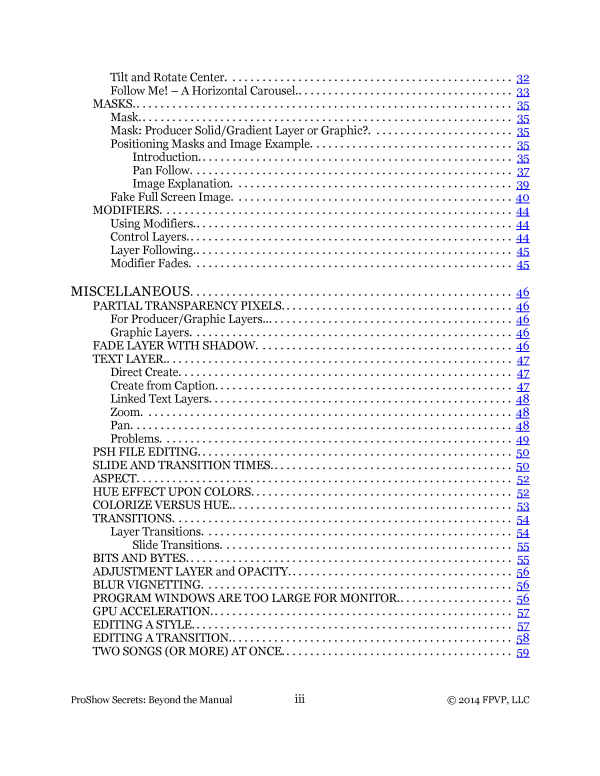
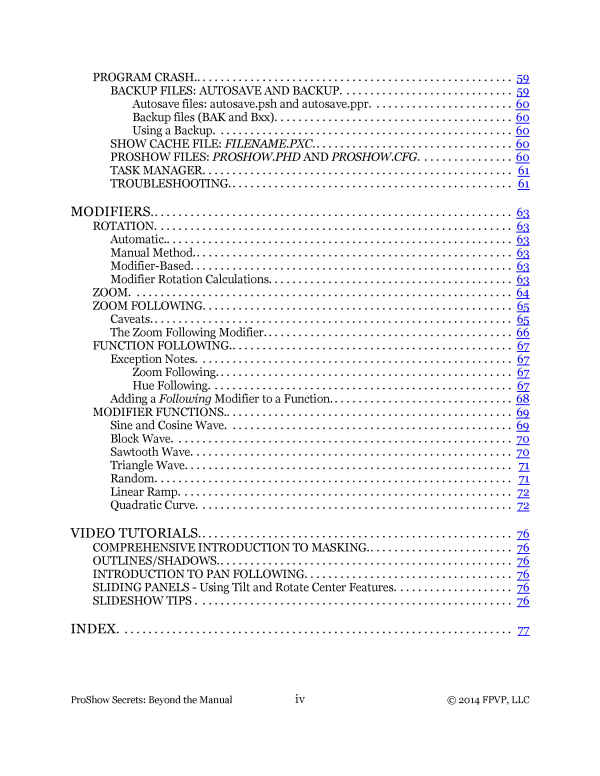
COMING SOON! ProShow Secrets: Beyond the Manual

Photodex has created one of the most flexible and useful slideshow programs available. It strives hard to ensure that the program’s power is within a novice’s reach. However, by overlooking the advanced user, Photodex has obscured some of ProShow’s power. For instance, modifiers and rotate center were introduced in Producer 4 (December 2008). As of version 6 (December 2013), both powerful features remain almost completely undocumented. Further, the manual’s rotate center entry actually contains incorrect information.

Photodex would have you believe that modifiers are only for the advanced user. Perhaps so. By not documenting them, however, Photodex guarantees that only the advanced user or the really determined will try them. As for Rotate Center, it’s quite easy to use. Nonetheless, there are hidden relationships that, if known, allow you to create truly interesting effects. The lack of documentation hides some of the program’s flexibility and capability. This book aims to remedy that by telling secrets Photodex has kept to itself; secrets that can help make the program jump through hoops.

I hope this resource proves useful to you.

Below is the book’s Table of Contents. As you can see, a considerable amount of territory is covered. The material is current as of ProShow v6.0.3410. Keep tuned in!

Index Page 1

Index Page 4

Index Page 2

Index Page 3

Tutorial: Sliding Panels, Part 2 (Images)

The 2nd in the Sliding Panel series has been released. In this one, the panels I used in Part 1 become masks of images. These create image panels that fade from the initial image into the next image as they move toward or away from their tilt point.

The image panels maintain the perspective they obtained from their initial tilt while they move toward or away from their tilt point. It’s a practical example but, if you master the techniques provided here, you should find yourself with some handy tools for making more effective use of ProShow’s rotation center feature.

The full tutorial can be found on my blog here. You can also find the “Sliding Panels Part 2 (Images) tutorial on my website here or on YouTube here.

Dale

SLABS, Transitions for ProShow Producer 5+

These things have been sitting around here for a couple of months now. FINALLY, I’ve finally gotten around to releasing them. These are a bit different from most of the previous effects … in these effects, rotation center is applied differently than the effects in the past. The hardest part was getting image at the end of the slab to behave correctly. Tricky stuff.

Still, the effect is nice and it is a pretty interesting application of ProShow features.

The effects use 2, 3, 4, and 5 slabs to move the previous slide off-screen and the next slide onto the screen. The previous slide is on the slabs side and the next slide in on the slab’s end.

http://fenimorephotovideos.com/Transitions_Producer.html?ifrm_Transitions=slabs.html

Transitions: Miscellaneous 4

I have been delving into more of the “mysteries” of the rotation center and experimenting with new ideas. Some things that seem quite obvious turn out to have some less than obvious aspects to them. So, while an effect may look simple, implementing it is less than simple.

In this set of effects are some called FauxTowers. These are an effect that initially started out as part of my initial 3D transitions. The result of the changes is a significantly different effect that makes the segments look kind of like a tower as they move around the screen. There are 8 variations that bring the next slide onto the screen and 6 variations that move the current slide off the screen to reveal the next slide. These effects make you want more.

Another set of effects are the Tilt n’Slide. There are 4 variations. These particular effects tilt the current slide as a whole or at the center. Upon being tilted, vertical slide segments move up or down the tilted slide to create the next slide. Upon being completed, the slide tilts back to fill the screen. The effect is quite nice at catching your attention.

A final set of effects are built upon panels. One effect, Panel Roll, rotates around the corners of the center panel, dropping panels at the corners and sides of the center panel as it does. Upon being completed, the next slide then resizes to fill the the screen. The next panels effect, Panel Slide, has 3 variations. A panel slides around the screen at an angle. As it moves in line with or perpendicular to the rotated angle, it drops more panels that create the next slide. When the next slide is complete, it rotates and resizes until it fills the screen. The effect is a very compelling way to introduce your next slide.

MONTAGE FOLDS 2 for ProShow Producer

Not long ago, Someone the ProShow Enthusiasts forum mentioned how much they like the IPad’s IPhoto Origami theme. That resulted in the creation of the folding effects in Montage Folds. I started working on an additional set of folding effects immediately after the initial set was released. That resulted in Montage Folds 2.

This additional set adds 5 image montages and another 39 transitions. The number of transitions and their associated montage styles provide plenty of options for making some really nice, effective, and appealing image presentations.

So, all together, the full Montage Folds collection (Montage Folds and Montage Folds 2) is composed of 20 Image Montage styles and 93 transitions. Of the transitions, 27 are for Producer v5.0+ and the remaining 66 are compatible with Producer v4.5+.

The Montage Folds collection is composed of two basic montage types: A and B. The “A” styles break the screen into 3 equal vertical segments while the “B” styles break the screen into 2 equal vertical segments. Mixing and matching the various transitions among the montage image styles works really well.

The following demo shows each of the available Image Montage styles but only a small subset of the available transitions.

http://fenimorephotovideos.com/styles_producer.html?ifrm_1=MontageFolds.html

130908-2220

MONTAGE FOLDS for ProShow Producer

Not long ago, Someone the ProShow Enthusiasts forum mentioned how much they like the Origami theme available on the IPad. I pointed her to a number of effects I’d already created which approximated what she was looking for. But, nothing I was oriented to a montage of images … they simply went from one slide to the next. So, I started working on effects specifically oriented toward a montage of images on a slide. Going was slow because I’ve been under the weather for nearly the entire month of August. Thank God for doctors!

Anyway, one thing led to another and I came up with the Montage Folds bundle: a set of 15 Image Montage Styles and 53 Transitions to go with them (PSP v4.5+: 31 transitions, PSP v5.0: 21 transitions). The number of transitions and their associated montage styles provide plenty of options for making some really nice, effective, and appealing image presentations.

There are two basic montage types: A and B. The “A” styles break the screen into 3 equal vertical segments while the “B” styles break the screen into 2 equal vertical segments. There are at least 2 different transitions for each style. But, mixing and matching the various transitions among the montage image styles works really well.

The following demo shows every Image Montage style but only a small subset of the available transitions.

http://fenimorephotovideos.com/styles_producer.html?ifrm_1=MontageFolds.html

130901-1120

FOLDS for ProShow Producer 5+

I was watching TV one day when I noticed a certain effect in a commercial. The Center Folding effects were the result of that inspiration. The Accordion Folds were inspired by the folding used in the Center Folding transitions.

So, there are 6 variations each of the Center Folding and Accordion Folds transitions for 16:9 Widescreen show in ProShow Producer 5+

http://www.youtube.com/watch?v=bO3hC0WMu6M

Find them here: Folds

ACCORDION for ProShow Producer 4.5+

I got an idea to slide some layers across the screen to see how it would look … simple idea for a simple enough effect. The result was pretty nice. The effect is simple, at least in concept (and in how it looks). Useful for a variety of different types of shows.

There are 8 variations of the idea in this set of transitions for ProShow Producer 4+ shows.

Find them here: Accordion

Slat Swing Cascade

At the beginning of the year, I created a few of these effects but couldn’t find the time to finish them. I got involved in doing taxes for others and this was a busy tax year! After the tax season ended, I was finally able to finish them. These 8, any aspect, transitions are useful for a variety of show types. They look better when transition times somewhere around 8 seconds are used. Check out the demo … visit my site!

Any Aspect shows, ProShow Producer v5+

http://fenimorephotovideos.com/psp_transitions2.html#SlatSwingCascade
130502-2035

Chevron, ProShow Producer 4+ Transitions

A couple of months ago I experimented with chevrons as a way to transition from the current slide to the next. Instead of just having a graphic slide across the screen in some fashion, I wanted to try something a little different. So, the chevrons actually pick up screen segments and move them off-screen, or they drop segments to build the next slide. So, it’s a bit of a different effect than what you might normally expect to see.

http://fenimorephotovideos.com/psp_transitions1.html#Chevron

Slivers (Transitions as Styles)

I was going to create these effects as transitions with a specific graphic. But, then I thought that it might be nice if the user could change the graphic in the effect’s slivers. So, the effects in this bundle (with a few exceptions, which I will deal with later) are created as if they were a transition, but are saved as a style. That is, the effect is in a slide between the initial and next slides. The transition slide will have a copy of the image from the initial and next slides. The effect will begin and end with the transition slide. If you want to transition between more complex slides (that is, ones with multiple images) you can convert the transition slide to a transition as desired.

I’ve provided two styles that contain 20 gradients and 12 graphics, respectfully, that can be used as replacements for the default sliver skin (which is gradient number 1). That is, the provided gradients and graphics provide a starting point for changing the default look of each transition’s slivers. Mix gradients with graphics and/or images for a more sophisticated or interesting look. Further, you can change the hue (it’s easy) of all of the slivers (using a reference control layer) to give a slightly different look to your effect.

So, these effects provide you plenty of flexibility in how your transition looks. It’s a new way of treating styles and they provide you with unprecedented flexibility in their use. But, you are also provided with two sliver transitions that transition from the previous to the next slide directly. Enjoy.

What’s Provided: 8 Styles of transition effects, 2 bonus transitions, and 2 styles containing starter replacement graphics and gradients.

The Demo

A quick intro to Slivers

Tiles Strips Flip & Tiles Strip Swings

These each are 4 new (8 total) transitions for ProShow Producer 5+. There are 4 variations of horizontal strips and 4 variations of vertical strips of the screen that swing or flip to reveal the next slide. This last two sets in the Tile Flip series, transition the current slide into a kaleidoscopic screen that breaks into strips that reveal a kaleidoscopic version of the next slide. That display moves toward to viewer until only there is only a single kaleidoscopic screen tile.

(Note: if you’re a Firefox user … I’ve noticed lately that FF’s latest iterations aren’t playing the embedded videos reliably (I get a black screen!). Apparently the problem might be a flash player later than v10.3. Please view them directly on the YouTube side by clicking on the “YouTube” button in the lower right to watch them directly on YouTube.]

Tiles Strips Flip

Tiles Strip Swings